
Today we have a versatile tutorial for you that can be used on a bunch of different knit patterns!
 |
| Rainey's Top, as written |
 |
| Neck Placket included in Mason's Romper |
You have probably seen our adorable Rainey's pattern that came out recently in Girl, Doll, and Baby sizes. Isn't it adorable? It's made of comfy soft knit so it's easy to get on and off.
That is, at least, for "most" kids.
My kids seem to have larger-than-average heads though, so even stretchy knit neckbands can be hard to get on and off. (This is the case with storebought shirts especially!) I did figure out long ago though, that this can easily be remedied by adding a neck placket! So when a tester came to me with the same issue, I knew just the thing that would help her out.


Look at this adorable little cutie in her modified Rainey's! You can see that her mother added a snap placket in back so the outfit is easier to get on and off. It turned out super cute! (The placket can be done in front instead, if you prefer.) Today's tutorial photos come to us from our fabulous tester Audra Chapin - yes, that's her darling model above. The instructions were adapted from our Mason's romper pattern, if you prefer to get that and have the calculations done and all in one place. But for now, we'll show you how to do it on whatever pattern you choose!
Please note that we included a LOT of photos here to make the tutorial easy to follow. It's really not a difficult or time-consuming project though. Just take it a step at a time and you'll be fine! For materials, you will need just a little more fabric (scraps will work) and a couple snaps or buttons. Let's get started!

First, you will cut your placket piece and interfacing. They need to be 6" wide and however long you want the placket to be. For example, a 4" x 6" placket will work for most baby and kid sizes. Cut that out of the placket fabric and interfacing.
Then you also need to adjust the neckband from whatever pattern you're making. Because the neckband needs to cover a little extra distance of the overlapping placket, you will need to add 2" to the neckband measurement. (For example, if your pattern calls for a 2" x 16" neckband, you will need to cut it at 2" x 18" instead.)
You will also need two 2" x 2" pieces of fusible interfacing to go on the ends of the neckband.
Finally, you can cut all the remaining outfit pieces as instructed in your particular pattern.
Now you're ready for construction!

Step 1: Take the placket piece and apply the fusible interfacing to the wrong side of it by ironing.

Step 2: Now you will use a ruler and fabric pencil/pen to measure and mark fold lines on the placket interfacing. First, lay the placket on a flat surface. It should be wider than it is tall. Using a ruler, draw a horizontal line 1/2" above the bottom of the piece. Then draw a vertical line 1/2" in from the left side and the right side. It should now look like the photo above.
Note: If you are using a clear ruler, be sure to slide it slightly to the side so the lines you are drawing are the proper distance apart.

Now draw four more vertical lines, each 1" away from the previous lines you drew. When you have drawn all the lines it will look like the picture above.

Step 3: You are now ready to create crisp folds on the placket, using the vertical lines you just drew. One at a time, fold the placket on a vertical line and iron until it is crisp. Each time it will fold inward with interfacing sides together.
After all of the vertical lines have been pressed, you will now fold and iron the bottom horizontal line. You should now have a crease on each of the lines you drew.

Now you need to mark one more vertical line on the placket, going right down the center, as shown above.
Then measure up from the bottom line and mark a dot on the center line that is 1/2" up from the fold (1" from the bottom edge). The placket is now ready!

Step 4: Take either the front piece or the back piece (whichever side you want the placket to be on) and lay it on a flat surface with its right side up.

Take the ironed placket piece and place it on the big piece, interfacing side up, and match the center of the placket to the center of the outfit. With the top edges matching, pin the placket to the outfit as shown above. Make sure the interfacing is lined up straight with the sides. Add pins to the lower placket too, so it won't shift.

Step 5: You are now ready to sew the placket to the outfit by sewing down the two middle folds and across the bottom fold that connects them, as shown in blue above. Sew slowly and be precise!

Step 6: With the placket secure, you are now going to cut down the very center line, from the top edge to the dot you marked.
Then you will cut from the dot to each corner you sewed, creating a small triangle. Be careful to cut very close to the stitching without cutting any stitches. See photo above.

Next, you need to make two small cuts on the folded flap below the stitching lines. Again, be sure to cut close to the stitching without cutting any stitches.

Step 7: You are now ready to fold the placket. First, fold the bottom horizontal flaps upward, as shown above. Iron if necessary.

Then fold the left side of the placket toward the right side as far as it will go, on the fold/line that you sewed. It should now look like the picture above. Iron the fold so it is nice and crisp.

Flip the outfit over so the wrong side is facing up. Reach through the opening and pull out the placket piece you just pressed. It will be attached on the right side as you view it here.

Under the bottom edge of the fold, you also need to find the small triangle and rectangle and pull them up through so they lay on top of the fold. This is very important! See the picture above.

Step 8: Now fold the side flaps inward and then fold the placket over so it is all stacked in one line, as shown above. Pin the placket in place, starting at the bottom, being careful to line up all the folds neatly as you pin. Double check to make sure the small triangle and rectangle from the previous step are sandwiched between the folds!
Optional: If you have a hard time pinning the triangle and square in place, you may use a small amount of fabric glue to secure them before pinning.

Flip the outfit over so it is right side up. You are now going to top stitch along the two inside edges of the placket, 1/8" from the edge, as shown in blue above.

Flip the outfit over to the wrong side again and repeat this step with the other half of the placket by folding it inward, lining it up, and pinning in place. This side of the placket will not have a small triangle and square to enclose in the fold.

From the right side of the outfit, top stitch along the long inner edge, as you did on the first side. Do not sew the bottom edge yet!
Note: If the placket layers are too thick for your ballpoint needle to handle easily, switch to a strong universal needle for these steps, or even a strong denim needle if you have extra thick fabric.

Step 9: On the front of the outfit, take the right side of the placket that is loose and lay it on top of the left side of the placket that is already attached. Line up the bottom edges neatly and pin in place.
Topstitch along the bottom edge of the placket, close to the fold. Then about 1/4" up from the first line of stitching, sew across the placket again. See blue in the photo above.

After sewing, all layers of the placket should be secure and it should open toward the right, as shown in the photo.

Step 10: Use the instructions in your chosen pattern to construct all of the remaining outfit except for the neckband. This may include adding sleeves, armbands, sewing sides, etc. It just depends on what you are making. When you are finished with this step you should have all of the outfit completed, except for the neckband.

Step 11: Take the neckband piece and use an iron to apply the interfacing pieces to each end of the neckband on the wrong side of the fabric. See photo above.

Step 12: Then fold the neckband in half on each end, with right sides together. Sew the fold in place on each short end edge, using a 3/8” seam allowance, as shown in blue.

Clip the corners. Turn the neckband piece right side out and use a creaser tool to make the corners squared.
Use an iron to set the long fold and make the corners nice and crisp.

Step 13: Find the center of the neckband and mark it with a pin on the raw edge.

Then find the center of either the front neckline or the back neckline (whichever does not have a placket) and mark that center point with a pin.

Match up the two centers and pin them together on the raw edges, as shown above.

Step 14: Turn the outfit over so the placket side is facing up, right sides out. Take one end of the neckband and match its folded end to the folded end of the placket, and pin in place.
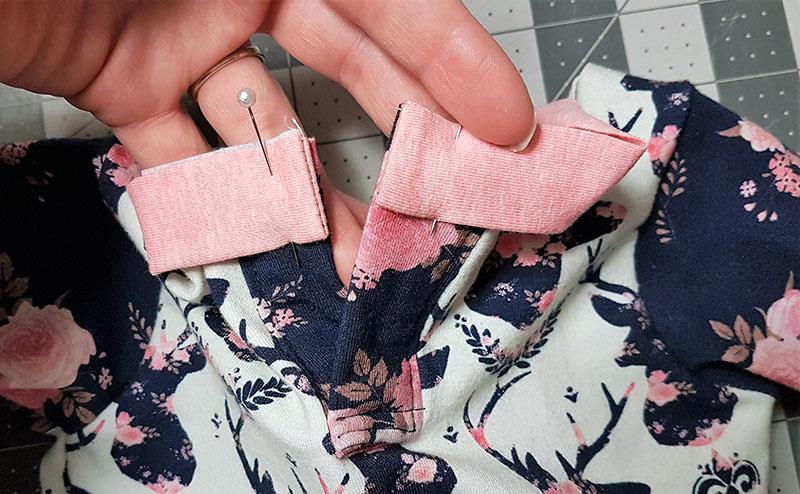
Then take the other end of the neckband and match its folded end to the other folded end of the placket, and pin in place.

Step 15: Pin the remaining neckband edge in place all around the neck edge, stretching as necessary. The more pins you use, the easier it will be to sew the neckband without puckers.

Sew around the neck edge using a 3/8” seam allowance, as shown in blue. Sew carefully to avoid puckers and remove the pins as you go.

Step 16: Turn the neckband up. On the right side of the outfit, topstitch the neckband by sewing 1/8" down from the seam, being sure to catch the seam allowance underneath. Also be careful not to stretch the neck edge while you sew. When you’re done, it should look like the photo above.

Step 17: You are now ready to apply your snaps according to package instructions. Place the first snap centered on the neckband above the placket. Then place another one or two snaps on the placket, spacing them evenly.

That's it! Now you're ready to add a placket to all your favorite knit patterns! A huge thank you to Audra Chapin for taking these cute Rainey mod photos for the tutorial. It turned out adorable.
When you complete your outfits, please come post a photo in our patterns group on Facebook! We would love to see! We'd also be happy to answer any questions you may have.
Also, be sure to check out our cute Rainey's pattern and our Mason's romper pattern. They made the perfect mash for today's tutorial. (Of course they're both perfect on their own too.) We can't wait to see what you make with them.
Let's Create! ~ Kristen


This is stunning a debt of gratitude is in order for sharing this blog I become enthusiast of your sites now. This blog is so fascinating and instructive.
ReplyDeleteThank you for sharing this blog. I learned many things about clothes in this article. I strongly suggest you boys clothing online india is most suitable for your children.
ReplyDeleteClothing is essential for everyone living in the world. Choose the right pants for you. Girls handloom dress online is perfect for your child.
ReplyDeleteBusiness partner selection is as important as starting a new business because there will be lots of changes in the firm with one addition. Therefore, you need to choose your partner wisely. According to Dr. Vinay Bajrangi, Selection of a Business Partner Astrologically can help you to choose the right person for your business and its growth.
ReplyDelete